CSSの一括指定「font」
参考サイト
CSSのプロパティのショートハンド11個まとめ!イラストを使ったチートシートで解説 | webliker
自分なりにまとめてみました。

1.font-style:文字のスタイル
2.font-weight:文字の太さ
3,font-size:文字の大きさ
4.font-heighet:文章の行間
5.font-family:フォントの種類
ショートハンド
font:12345
例:.el{font:italic bold 16px/1.8 Arial,'MS ゴシック', sans-serif;}
- 「font-size」と「font-family」以外は省略可能
- 「font-size」と「font-family」を両方書く場合間に「/」を入れる
CSSの一括指定 「background」
参考サイト
CSSのプロパティのショートハンド11個まとめ!イラストを使ったチートシートで解説 | webliker
自分なりにまとめてみました。

1.background-color:背景色
2.background-image:背景画像
3.background-repeat:背景画像の繰り返し
4.background-position:背景画像の位置
5.background-cover:背景画像の固定
6.background-attachment:背景画像の大きさ
ショートハンド
例 border: 1 2 3 4 56
.el{background: #333 url(bg.png) no-repeat 0% 5% fixed/cover}
- 1~6を全て書く必要はない
- 「background-color」を書くだけでもいい
- 「background-position」は「左右 上下」の順番で書く
border
参考サイト
CSSのプロパティのショートハンド11個まとめ!イラストを使ったチートシートで解説 | webliker
自分なりにまとめてみました。
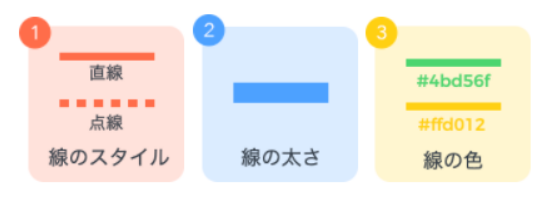
1.border-style:線のスタイル
2.border-width:線の太さ
3,border-color:線の色
ショートハンド
border: 1 2 3
.el{border:solid 2px #ddd}
CSSの一括指定 「box-shadow」
参考サイト
自分なりにまとめてみました。

ショートハンド
box-shadow:1 2 3 4 5 6
.el{box-shadow: 2px 4px 10px 4px #000 inset}
- 単位はpx使用
- 影の移動=正の整数以外に「-10px」とマイナス単位の指定が可能
- 影の色は不透明度を変更した色を指定して調整する事が多い
- 内側に影を付ける場合最後に「inset」を付ける
CSSの一括指定 「border-radius」
参考サイト
自分なりにまとめてみました。

↑「border-radius」=4個の角をまとめて指定するコード
1border-top-left-radius:左上の角丸
2.border-top-right-radius:右上の角丸
3.border-bottom-rightv-radius:右下の角丸
4.border-bottom-left-radius:左下の角丸
※bottom=下
ショートハンドの例
1.border-radius: 1 2 3 4
.el{border-raidius: 10px 15px 20px 30px
2.border-radius: 1 23 4
.el{border-raidius: 10px 15px 20px
3.border-radius: 12 34
.el{border-raidius: 10px 15px
4.border-radius: 1234
.el{border-raidius: 10px
CSSの一括指定 「padding / margin」
参考サイト
自分なりにまとめてみました。
cssプロパティ=まとめて記述可能な「ショートハンド」
と言われる書き方ががある。
制作スピードがあがりプロも必然なテクニックになります。
---------------------------------------
1.padding-top:上の余白
2.padding-right:右の余白
3.padding-bottom:下の余白
4.padding-left:左の余白
1 2 3 4
.el{padding: 10px 15px 20px 30px}
↑上下左右を指定
1 23 4
.el{padding: 10px 15px 20px }
↑上、左右、下を指定
13 42
.el{padding: 10px 15px }
↑上下、左右を指定
1234
.el{padding: 10px}
↑全て指定
「head」タグ内のコードのテンプレ
参考サイト
記事内のコードを練習で記述したいと思います。
※コードが長いので完成したらコードに色を付けます。
html
<head>
<meta charset="utf-8">
<meta name="robots" content="index.follow" />
<title>ページタイトル</title>
<meta name="description" content="説明文" />
<meta name="viewport" content="width=device-width,minimum-scale=1,initial-scale=1">
<meta http-equiv="X-UA-Compatible" content="IE=Edge">
<link rel="shortcut icon" herf=”ファイル名.icon">
<link rel="apple-touch-icon-precomposed" href="画像のパス/apple-touch-icon-precomposed.png">
外部ファイルの読み込み
<link rel="ファイルの種類" href="ファイルの場所">
<script src="ファイルの場所"></script>
スマホページのURLが異なる場合(pc側)
<link rel="alternate" media="only screen and (max-width: 640px)" href="スマホページのURL" />
<link rel="canonical" href="PCページのURL" />
必要であれば
<link rel="canonical" href="評価を統一したいページのURL" />
分割ページの場合
<link rel="prev" href="前のページのURL">
<link rel="next" href="次のページのURL">
フェイスブックのOGPタグ
<meta property="og:site_name" content="サイト名" />
<meta property="og:url" content="ページURL” />
<meta property="og:type" content="ページタイプ" />
<meta property="og:title" content="ページ説明文" />
<meta property="og:description" content="サムネイル画像URL" />
<meta property="fd:app_id" content="appTDを入力" />
<meta property="og:locale" content="ja_JP" />
TwitterのOGPタグ
<meta name="twitter:card" content="カードの種類" />
<meta name="twitter:site" content="@ユーザー名" />
<meta name="twitter:description" content="ページ説明文" />
<meta name="twitter:image:src" content="サムネイル画像URL" />
</head>